Showing posts with label How-To's Day. Show all posts

Tuesday, October 9, 2012

How-To's Day: Upcycled Holiday Wreath Bases

One of the major staples of Holiday decorating is the WREATH! If you are a big holiday decorator I am sure a new wreath is something you get excited for every year.  Or maybe you know that person who goes koo-koo crazy for decorating and you want to bring them a new wreath for a hostess gift or holiday party. This is a simple and affordable way to create a wreath WITHOUT USING STYROFOAM!!!

While Styrofoam wreaths are the usual bases for crafted wreaths and are a very versatile base to create your own holiday decor, Styrofoam is majorly gnarly on the environment and I try to look for alternatives when personally making my crafts.

I am a huge fan of this method of creating a paper wreath form because it is basically free. Where as a Styrofoam wreath base will run you ~$5.

All you need to make the base is a brown paper shopping bag and a roll of masking tape!!!

After opening the bottom of the grocery bag - scrunch the top of the bag to the bottom, creating a scrunched paper circle. Make sure you take off the handles. The handles can be added to the scrunched shape while taping if there is an uneven surface that needs beefing up.

Using this bag method you will get approximately 11" diameter circle which is a pretty standard small wreath size. To get a larger diameter you can create the circle with paper packaging or tape the grocery bags together.

You can wrap the tape as tight or as loose as you'd like.  Try out a few different tightness-es and see what works for you :)
Normal taping will leave the wreath about 1" thick. If you want a thicker wreath you can add two scrunched shopping bags together, then wrap with tape. This will create a base that is ~ 2" - 2.5" with two and over 3" with three together. If you wrap multiple bases together you should tape everything extra tight and you will have a super strong wreath base sturdy enough for a holiday heirloom for years to come.


The best part of utilizing the paper base is when you want to have a different wreath next year you can recycle this wreath keeping harmful materials like Styrofoam out of our trash!!!

Last year we had a Holiday Making Party where we highlighted sewn fabric bows and we had these wreath forms so people could make their own holiday wreath. Hopefully we can host another party this year and share some ideas so you can host your own with friends too!

Here is a peek at one way to use the base and do a snow theme with old dryer sheets and junk-mail paper snowflakes:

We would love to see your wreaths if you try out this Eco-friendly paper base! Post a comment or leave a picture on Our Facebook to share your holiday decor :)

Happy Making!!! XOXO, KC

Tuesday, October 2, 2012

How-To's Day: Punched Paper Stationery and featured guest at CAFAM Etsy Craft Night

This Thursday KC is the guest crafter at CAFAM's monthly Etsy Craft Night.  Here is a sneak peek at the project available that night.  We are making needle pierced and stitched paper on this week's how-to project.

Supplies needed
  • Medium weight/thick card stock. Thicker paper provides more definition and will hold up a larger needle pierce.
  • Various size needles.These can include sewing pins, embroidery needles and can even include awls or other industrial piercing tools.
  • Item to protect work surface such as towel or foamcore to punch the paper design into.
  • Tracing paper and your design flipped or reversed. When outlining an image the pierce holes will produce a flipped version of a design, unless you flip the tracing image first.
  • A pencil to freehand draw your image.
  1. Draw the image to be pierced with light penciling on the backside of your paper if you wish to freehand draw the pencil lines. You can also place the image on which ever side you like to be the smooth side (back) 
  2. Use the lines of your image, or your pencil lines as the template to create your pierced lines.

A finder needle such as a sewing needle will make a very tiny and more of a stippling affect dot.
Personally I like to use a larger instrument or needle for the outlining of the shape and then work my way in with a smaller needle for the inside detailing work.

Also watch your speed and placement because placing the holes/dots too close to one another can result in a "blob" and be visually distracting.

Here is an example of the finished card:

It is easy to make a plain piece of paper a simple and modern card just by punching the outlines!

Or you can create a new variation of your logo with this technique:


Wanna Come make the project with me?
Etsy Craft Night: Punched & Stitched PaperLed by KC Cooper Sears
Thursday, October 4 from 7:00-9:00pm
$7/ Free for CAFAM Members (includes materials, drinks, and snacks)
In the CAFAM Courtyard

Make your mark with crafter KC Sears and create punched cards and pictures. KC will have funky imagery to inspire you—think vintage California, handmade items, even tattoos—and after you pierce the image, embellish it further with colorful stitching.

Hope to see you there!!!
XOXO, KC

Tuesday, September 18, 2012

How-To's Day: Old Book into Wall Art

For this week's How-To, we are sharing a quick transformation of any hardbound book into an origami-style wall art.  Really all we are doing is folding the pages in interesting ways and hanging it up open-faced.  The creativity is in the steps and rules you decide for moving through the book.  Come up with your own and let us know your methods!
A variety of creative directions you can go!

Below are the steps to create this book's design.


Materials
  • Hardbound Book
  • Plate Hanger (found at Craft or Home Stores)
  • Nail or hook for wall mounting

Plate Hanger supports and stretches the book open
Steps 2-5
 Steps
  1. Choose a small book with thick pages, open it to the first page
  2. Fold the corners of the 2 pages inward to the spine, leaving a half inch in the center of each page unfolded.  This results in 4 triangle corners.  Keep this corner spacing consistent as you continue.
  3. Choose two diagonal corners to remain folded inward and leave the rest creased, but open.
  4. Join the two pages together.  They should fit flat with the corners flaring out.  
  5. Fold the next 3 pages in half inward to the spine.  This will create thickness at the base so the design won't get smashed together.
  6. Repeat steps 2-5 until the last page.
  7. Hang the book up with a plate hanger attached to the back.
Enjoy the process.  You don't have to follow these steps, come up with new patterns of repetition! 
Check back every Tuesday for the How-To's Day demo to upcycle used items around your home.


--Kevin Sears

Tuesday, September 11, 2012

How-To's Day: Filet a Soda Can


Kevin here,

This week's How-To is a technique I use to prep beverage can materials for some of our upcycled products.  It took me months and many cut fingers to hone my craft.

Soda Cans are cool because they have flashy graphics that marketing science totally knows what you like.  Except last year's silver polar bear can from Coca Cola in partnership with the WWF.  Sorry cute bears, but you were a little hard to see behind all the flashy diet-cola lies!
I heard Pepsi is nice...

These flashy images are printed on aluminum and that makes them recyclable but also good craft materials.  Here's my method for stripping the guts of a soda can to maximize the design real estate.

Items
  • Exacto knife
  • Flat edge surface
  • aluminum can

Choose anywhere to cut down the length of the can.  Don't cut through the interesting stuff.

Start at the bottom of the can.  Slice around the diameter and cut the bottom off.  Removing the bottom, first, will make the last step much easier.

Hold the can upside down in one hand.  Peel the highest corner with the other hand and strip the can of the goods.  Since the heavier aluminum is at the top of the can, keep the tension where it is ripping to retain the most graphical surface area.  Roll the aluminum strip on a surface edge to flatten.

Being able to quickly strip the design off the can in the last step is actually kind of fun.  If you do several in one sitting it's like craft meditation. 

Of course, save the soda tab for other projects. I'm curious if other parts of a soda can make awesome crafts.  Let me know if you have made anything with the tops and bottoms of soda cans.  It should be interesting.

--Kevin Sears

Tuesday, September 4, 2012

How-To's Day: Make a Crafty Party

We had such a wonderful response to our Etsy Craft Party at CRAFTED last month and wanted to share some project tips to include in your own craft party.

For a Paper Craft Party

Always perfect for a paper party - rubber stamps & ink, paper punches and craft paper.
Project ideas:  Make your own DIY gift wrapping paper, Tags, Embellishments, Wall Art, Stationery

Also fun to have on hand - Postage Stamps!


Here is more details to get your stamps ready. 
By adding some bottle cap magnet blanks attendees have the option to make magnets along with the paper crafts super easily. 
Simple instructions can be found here.

Fabric Fun Party
Grab your girlfriends and update your wardrobe with a craft party :)


Sewn Fabric Bows can be a great wardrobe addition & easy for all levels of sewers.

Fabric yo-yo's
Add to shirts, purses, brooches, earrings, necklaces and all kinds of things.
Buttons
Even covering things with buttons is enough to make something new again!

Fabric + More Sewing  

Add some Lavender for some great gifts:

Heat Pads / Ice packs
Gather up your dryer sheets and make some fabulous sachets!!!


Around the House Party

Corks
Project ideas: Cover Votive Candles, Make Cork Boards, Wreaths, Mini Planters

Green Cleaning
Easy to make - DIY Laundry Detergent with 3 ingredients 
Don't forget every party needs some food and a signature cocktail :)

Check out some fun cocktail ideas from our Pinterest Vault

What is a celebration without some decorations?!?

We love finding party ideas on Pinterest! Check out our Weddings & Party Board to figure out some ways to decorate your party utilizing all kinds of fun themes.

Do you have any projects that are a craft party hit? We would love to see your party fun and hear any tips for our next party :)

XOXO, KC

Monday, September 3, 2012

Have a Green Labor Day!

Labor Day Weekend at CRAFTED
KC and Kevin will be spending Labor Day doing some fun work preparing upcoming How-To's and sorting our newly donated materials.  We challenge you to find something to donate in your house today and something that you can upcycle into new!  Then come back tomorrow for our How-To's Day demo of what we invented.  We hope it will inspire you to get creative with your idle items. 

CRAFTED last weekend was busy with the BBQ Pig Roasting Truck.  The food was good and the weather wasn't too hot.

yum!
That'll do pig...that'll do.

Enjoy your Labor Day, and enjoy a green day!

XOXO KC & Kevin


Tuesday, August 28, 2012

How-To's Day: Upcycled Dishwasher Label

We have been using this sad, pathetic "CLEAN" note to label what is inside the the dishwasher.  Our current routine is when you load and run the dishwasher you pull the magnetic note off the refrigerator and place it on the dishwasher.  This works and all, but the note is sloppy and depressing and I would really like something special just for the dishwasher that says "Clean" and "Dirty" so all you need to do is flip it to label which stage the dishwasher is at.

With that in mind here is a quick project to make a dishwasher label.

You will need jar lids, random paper, some way to letter (like stickers, cut paper letters or a marker), Mod Podge Dimensional Magic, and Rare Earth Disc Magnets. The Rare Earth Disc Magnets we are using are 1/2" X 1/16" Neodymium N42 magnets which have a pull force of 3lbs. These tiny magnets are more than adequate to hold up the lids perfectly. Please check out magnet safety here before using these super intense magnets.

Attach the magnet on the back of the lid with a glue like liquid fusion. Collage and assemble the papers and letters inside the lid so that one side says "Clean" and one side says "Dirty". Add a thin layer of the Mod Podge Dimensional Magic and let dry.

Now the dishwasher doesn't look so sad anymore! Yay!!! Plus, now we won't accidentally re wash the dishes or pull out dirty ones thinking they have been cleaned already.

We'd love to see what you come up with if you make one for yourself.  Leave us a comment or post a picture on our Facebook wall here.

XOXO, KC

Tuesday, August 21, 2012

How-To's Day: Summer Upcycling Refresher

Kevin here,

Make. Shop. Live. has had a hot summer and busy time for crafters and creative types.  We wanted to list some of the hottest How-To's from these past few months to get your creative juices flowing!

Using a variety of extra fabrics and clothes and some strong little magnets, our team completed an assortment of handmade cloth bow ties.  Upcycle those old outfits and learn how now!  


Follow these 4 quick steps to make your own Bookends out of Vinyl LP Records.


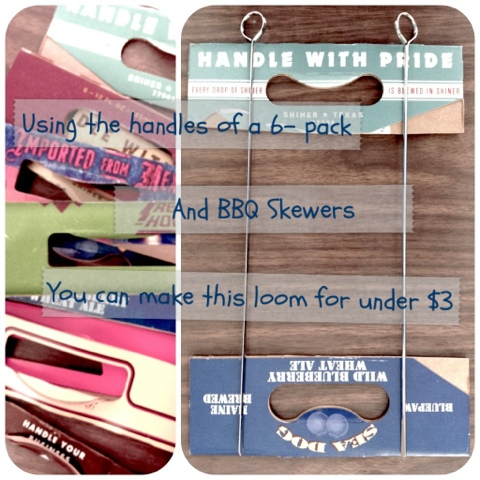
Beer and BBQ should have been on your agenda this summer!  Use the leftover packaging and Skewers to settle in for the winter and start your Loom.


Using fresh Lavender flowers and your favorite vodka, mix it up and enjoy a handmade refreshment.


The Upcycling continues every Tuesday.  See you here next week for the How-To's Day Handmade Idea!

--Kevin


Tuesday, August 14, 2012

How-To's Day: Paper Decorations for a Craft Party

I love making things out of paper!!! It is one of my absolute favorite materials to work with. One of my favorite materials to have in the studio are maps.  Thomas Guides are especially helpful since there is so many pages of maps inside each one.  The warehouse is so vast down at CRAFTED that basic paper garlands are a must to help add to the decorations.  We recently did a demo using the small tubular ornament template by Martha Stewart Crafts as seen here, and it is the perfect tool to crank out some massive decorations.

For the paper lanterns we are using this time saving tool, but you can also create the same result by folding a 6.5" square into a rectangle, then cutting slits in 1/2" intervals making sure to leave at least a 1/2"  border on the raw edge.

Always an easy favorite when making paper decorations is the classic paper chain.  We have been using the scraps leftover from the lanterns to make paper chains to add to our decorations.

Another awesome paper decoration is these great mini suitcases to reinforce the Wish You Were Here theme as well as decorate their booths. Using a rectangle box and some imagination you can make a super mini suitcase too! Check out this great example from Desiree B-

Off to keep making paper lanterns for our decoration meeting tomorrow ;)

XOXO, KC
Related Posts Plugin for WordPress, Blogger...