Showing posts with label Fabric. Show all posts

Tuesday, October 23, 2012

Brooklyn Bows featured in Manhattan Brides Magazine

page 38.
Make.Shop.Live. is proud to be in this month's Manhattan Brides Magazine.  We have already featured our custom magnetic fabric bow ties for our friend's Brooklyn wedding. Click the below photo to learn how we did it!


Congrats to Alessandra and Paul Womack and it was a pleasure to provide these special re-purposed gifts for your guests to wear throughout the reception.  For more tips on re-purposing materials and custom event crafts, check back every Tuesday for the How-To's Day Tutorial.

Make.Shop.Live.

Sunday, April 29, 2012

Donate Your Leftover Fabric: Women of Cooperativa El Nido

Are you doing some spring cleaning and you find yourself wanting to 
put leftover fabric to good use?


photos via Coletterie
I am always looking for ways to put leftover fabric to good use! Colette Patterns has a subscription called Snippets, a newsletter that highlights weekly sewing tips ranging from helpful techniques to outreach with organizations like Cooperativa El Nido who is seeking donations from your leftover fabric scraps. You can check out all of the information on this self-sustaining community of women in the hills of Capira (just outside of Panama City) here

If you’d like to donate your own pieces of fabric, please send all donations to Kathryn, who works with these women in Panama. She has kindly provided a US mailing address for those of us here in the states:
Kathryn Wellemeyer
5542 Silverleaf Court
Haslett, MI 48840
You can also email the cooperative at cooperativaelnido at gmail.com for any questions.

If you know of any other organizations seeking fabric donations- especially SoCal organizations, please leave some comments so everyone can check those out too.

Tuesday, April 10, 2012

How-To's Day: Tea Dye Fabric

Tea staining is one of my favorite ways to change fabric with on-hand natural materials and very little effort. It helps make things look aged, more natural and can even help dull bright fabric to give you a whole new take on the overall feel of the fabric.


Here you can see where I took six different pink fabrics and stained them all together yielding a wide range of results.  These fabrics will be a part of a wedding we are working on where the bride is going for a vintage feel. The tea stained fabrics are the perfect touch to emphasize the vintage theme and she really loves the muted pinks we get from the tea staining!  It might have been nice for me to have gone a bit lighter on the tea- this would be considered a strong batch in my opinion, if I had lessened the amount of tea bags by half the pinks would be less beige-y. ALSO: Keep in mind you can always redye the fabric again to make it darker, but if you go too dark at first you cannot lighten it up once you stain your fabric.

This method works for fabric made with all natural fiber (cotton, linen, rayon, silk) but it also does some cool things with  mixed blends where it will change the portion of the threads where the natural fibers are and leave fibers like polyester or nylon in its original state.

First things first, you want a big pot to "cook" everything in. This has been my go to pot for natural dyeing since college and it is needed/ helpful when making a large batch because you want your fabric to be able to move freely for an even dye.  The great thing about using tea and other natural dyes is you don't necessarily need to have a "non-food pot" just for dyeing since the tea is safe and edible.  


I like to tie all of the tea bags together in a clump so it is easy to fish them out. However you would like to do this- feel free to let them float individually and do a quick fishing out before adding fabric, that works too! For this intensity I put in 12 Lipton tea bags into the pot and waited for it to come to a boil.

While the pot is starting to boil take your fabrics and make sure to fully soak them in water in the sink or another bucket. You want the fabric to soak for ~10 minutes so that you are sure that it is wet all over completely. This will help it dye evenly without patches or faded looking spots.


Take the tea bags out of the boiling pot and turn the heat down to a simmer. Slowly put the soaked fabric into the hot tea mixture. You want to make sure to stir and separate your fabric so that it dyes evenly. You will want to stir and move the fabric around for ~30minutes. 

NOTE: For a lighter stain use less tea bags or less time, and for a deeper stain you can remove the pot from the heat and keep your fabric staining overnight.


Once you fabric is stained you can reuse the tea water for another batch. If the fabric is your desired color and want to reuse the tea you will want to fish out the fabric. If you are finished using the tea water and are not saving it, pour everything out in a sink where you can wash your fabric out by hand to lock the color in.  I like to run the water as hot as my hands can take it (Make sure you wear gloves or be careful with this step- the fabric will be hot from the pot) rinsing the fabric out until the water is mostly clear. Then shift to cold water and get the last bit of the residual tea out completely.


Once your fabric is clean it just needs to dry and it is good to go! Personally, I like to hang dry my dyed fabrics but you can use a dryer if you must. It is way more Eco-friendly to skip the dryer- so invest in some pants hangers with the clips and place everything in the shower to dry or hang outside if you are lucky to have a spot to do so.  Either method you use to dry you will probably need to iron everything before it looks "crisp" and smooth again.


The cool thing about dyeing your fabric is you take off all the sizing on the fabric as well as makes sure it is pre-shrunk. If you have ever worked with fabric without doing this and had the project get ruined once laundering- dyeing it first will save you the heartbreak of shrinking it later.

We hope you can try it out and enjoy! I would love to see your projects or hear any tips you find from tea staining you own fabrics :)
XOXO, KC

Wednesday, September 28, 2011

Wedding Wednesdays: Our Wedding Invitations and Cakes

Hi everyone! Yesterday I posted some fun pictures from Kevin and I's wedding- if you missed it, here it is. Today I wanted to share some details on a fun cake motif that is a fun way to incorporate fabric into your big day.
I really like that this cake inspired the tone for our invitations and ultimately set the tone for our wedding.  I made several versions before I came up with this appliqued and machine embroidered cake. The red and turquoise color pallet originally started out of necessity because our reception site was floor to ceiling RED, bright red, and I really wanted a colorful wedding and I wasn't sure how to work everything in.  

Honestly with the distance I was a super weird bride and didn't look at my reception site in person until the day before my wedding. I think everyone warning me just in case it would be a problem got me to think the red was an overly big deal... but it was minimal in hindsight. 

I am glad I got worked up about it though because number one in my planning became what to do about the red. Red is one of my least favorite colors- but for my family of die hard NC State Fans they were stoked to wear their favorite color to our wedding.  My Grandpa was so happy that after working at NC State for next to forever he had his favorite red dress outfit that he could wear.  Come to think of it the fashion at my wedding made an impact on my deep subconscious because up until our wedding blue in any shade wasn't really my thing either.  It really was these fabric cakes that started my obsession thinking back on everything. Wow! Thanks little fabric cakes and all of my girlfriends in their super cute turquoise dresses- I dunno what I would do without my turquoise now!

Here is a a highlight of the process that I took to make these little cakes for the invitations.  The cakes don't have to only be for invites- I could see large numbers over them for table numbers and could be stitched or glued onto almost anything.

First, I just created a box the size I wanted to final size of the card to be to be and played around with layouts and fonts for the inside of the invite. I am pretty sure these cards are made to fit envelopes that were 4.75" x 6.5" so the card was 9" x 13" and I added small corner markings to know where to cut and fold.  One of the benefits to printing and making the cards was we were  putting very basic information on the invitation and it seemed crazy for someone else to make the cards. You can see at the very bottom of the postwhat the text inside the invite looked like. Here are amazing examples on how you could word your invitation. Usually too there is a sample in one of the many bridal magazines your reading that you can work off also. 

I printed of 95 cards on my home printer. Folded each one with a bone folder. Then cropped them with a craft paper trimmer to size. 

I drew by hand a cake that I liked and cut apart all of the pieces after numbering them.  There is a top piece of cake (1), a middle piece of cake (2), a bottom piece of cake (3), and a plate (4).  You could do as minimum as 2 different pattern and/or colors of fabric but I chose 4 all together.  Once you cut and number these pieces you can either use them as a template and trace around them on the paper side of the heating bond (which is what we did) or you could print out a sheet of paper where you have laid out the pieces on it in as many times as can fit and stick it to it to the back off the heat and bond.  Heck, now a days printers might could just print on the paper side of the heat and bond possibly now.

Sunday, October 3, 2010

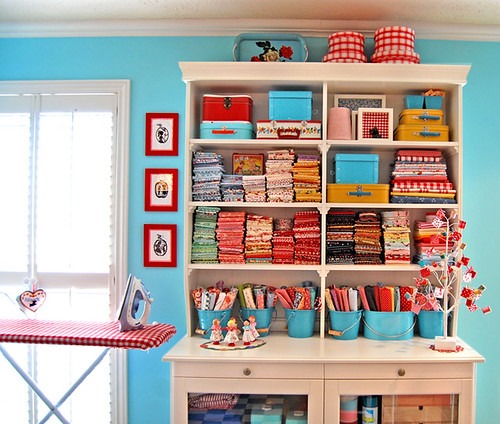
Fabric Storage


Fabric storage, originally uploaded by *jenny b allsorts.
These are my absolute FAVORITE colors!!! Not only do I want to start painting my room this color, BUT all this fabric storage too!!!!!!!!

I can't pull myself away from this picture! I want to live in it :)

Friday, August 27, 2010

Colette Patterns

A while back I made a post about a Colette Patterns that was the absolute must on my sewing to-do list.  Once I get back into sewing it is a MUST to actually complete this pattern because it is AWESOME!  Mostly, I really love Colette Patterns for their awesome sewing info, retro dress patterns and their whole bundle of sewing goodness- So I can't wait to complete this project and rack up more ;)
Their Blog, if you don't follow already, has wonderful posts on vintage techniques, alterations, and everything a seamstress wants info on.  Today the post was really awesome about Recycled Fabric Bed Sheets.  All DIYers and recycle fanatics should check it out! 

*They include some great stuff on Facebook too*

Tuesday, August 24, 2010

How- To: Dyeing with Onion Skins

 ONIONS Skins are my absolute FAVORITE way to dye and overdye fabrics.

Here is a fun and natural way to dye fabric and yarn.  I am using a mix of cotton fabrics found and collected from various sources.  All natural plant fiber fabrics can be dyed this way but depending on the fabric content results may vary.
I love when I go to the grocery store and the onions have been overlooked- that is the perfect time to get big pieces of peel.  The cheesecloth helps remove all of the skins from the dye bath and makes it easier to rinse the fabric after dying.  Use dyed pieces of cheesecloth in your next project or as a colorful way to package a future gift :)

 What you need to start is: A produce bag full of onion skins and cheesecloth. Optional- cotton string to tie cheesecloth closed.

Related Posts Plugin for WordPress, Blogger...