Showing posts with label Christmas Crafting Extravaganza. Show all posts

Tuesday, October 9, 2012

How-To's Day: Upcycled Holiday Wreath Bases

One of the major staples of Holiday decorating is the WREATH! If you are a big holiday decorator I am sure a new wreath is something you get excited for every year.  Or maybe you know that person who goes koo-koo crazy for decorating and you want to bring them a new wreath for a hostess gift or holiday party. This is a simple and affordable way to create a wreath WITHOUT USING STYROFOAM!!!

While Styrofoam wreaths are the usual bases for crafted wreaths and are a very versatile base to create your own holiday decor, Styrofoam is majorly gnarly on the environment and I try to look for alternatives when personally making my crafts.

I am a huge fan of this method of creating a paper wreath form because it is basically free. Where as a Styrofoam wreath base will run you ~$5.

All you need to make the base is a brown paper shopping bag and a roll of masking tape!!!

After opening the bottom of the grocery bag - scrunch the top of the bag to the bottom, creating a scrunched paper circle. Make sure you take off the handles. The handles can be added to the scrunched shape while taping if there is an uneven surface that needs beefing up.

Using this bag method you will get approximately 11" diameter circle which is a pretty standard small wreath size. To get a larger diameter you can create the circle with paper packaging or tape the grocery bags together.

You can wrap the tape as tight or as loose as you'd like.  Try out a few different tightness-es and see what works for you :)
Normal taping will leave the wreath about 1" thick. If you want a thicker wreath you can add two scrunched shopping bags together, then wrap with tape. This will create a base that is ~ 2" - 2.5" with two and over 3" with three together. If you wrap multiple bases together you should tape everything extra tight and you will have a super strong wreath base sturdy enough for a holiday heirloom for years to come.


The best part of utilizing the paper base is when you want to have a different wreath next year you can recycle this wreath keeping harmful materials like Styrofoam out of our trash!!!

Last year we had a Holiday Making Party where we highlighted sewn fabric bows and we had these wreath forms so people could make their own holiday wreath. Hopefully we can host another party this year and share some ideas so you can host your own with friends too!

Here is a peek at one way to use the base and do a snow theme with old dryer sheets and junk-mail paper snowflakes:

We would love to see your wreaths if you try out this Eco-friendly paper base! Post a comment or leave a picture on Our Facebook to share your holiday decor :)

Happy Making!!! XOXO, KC

Tuesday, December 13, 2011

How-To's Day: Fabulous Fabric BOWS

This past Saturday afternoon I had the pleasure of hosting our first annual Christmas Craft Party. Personally, I think it was a huge success! For the layout of my apartment it felt huge, but we had a small group of crafters over and amongst the evening's projects were these simple fabric bows that can be uses as embellishments to necklaces, hair clips, pins, and many more ideas.


I will illustrate the project, then include some pictures taken Saturday at the party.

Friday, December 9, 2011

What I Wore- Friday 12/09/11

Hi guys! During this time of the year when everyone gets sick usually I can skate by and miss the general yuck.  What I miss in flu season my lady migraines make up for, for sure- but this week has been kicking my butt. At first I thought I maybe coming down with the Flu after exhausting myself planning on UNIQUE LA, but thankfully that wasn't the case.  The unfortunate thing that happened instead was that I got a sinus infection.  I think I have had sinus infections before, but I either didn't realize what it was or it wasn't bad enough to bother me.  This morning however was horrible and when I was able to get to the doctor I found out that I had a migraine on top of sinus infection :( No Buenos. 

Tomorrow I am hosting a Christmas Craft Party Extravaganza at our place and between cleaning/ prepping for that and working on the last batch of Reinbeers, I have been neglecting posting pictures to the blog. They are on Flickr however so if you are needing a fix on the updates or if you need the pictures grab them there :) I will be working through the Holidays getting things labeled and posted.

This dress was everyone's favorite of my Top Shop shopping trip in NYC back in May.  Read more about other outfits from this trip here. Kevin loves yellow, and everyone (the shop girls + Alisa) had nothing but nice things to say about how I looked in this dress and I am glad I listened to them and purchased it.  
When I feel crappy it really makes me happy.  I love how colorful and playful it is.  Plus it is super comfy for working around the house. 
I am obsessed with BOWS! These little shoes are my favorite black flats right now.  Wanna see more bow inspirations check out our Bow board on Pinterest.
I love this cummerbund that I found one of my first trips to Jet Rag.  There was one batch of clothes that took me back to chorus in middle school- We wore black pants, white button up shirts and a red cummerbund. The batch at Jet Rag must have been for people with similar uniforms only the base is black and there was pink, purple, and green motifs- way better than plan 'ol red. I have been waiting for an opportunity to rock out and make the cummerbund a statement piece and I really like mixing patterns when something is this busy. Maybe I can work it into a holiday party outfit... hmmmm. Jeez, no I am trailing trying to think of what I'll be wearing all holidays- I really need to get on making some outfits.  I love dressing all fun over the holidays!!! What is your favorite thing to add to your wardrobe? Or your favorite theme to dress up over the holidays? 
I would love to hear what your favorites are :)

Well, off to get some rest before a busy day! Best wishes to everyone and have a super weekend!
XOXO, KC

Friday, November 18, 2011

Team EcoEtsy's Holiday 2011 Gift Guide

Yay! This year's Holiday 2011 Team EcoEtsy's Holiday Gift Guide is out and ready for you to check out here.

(image from EcoEtsy Blog)
We are on the "Gifts Under $20" Section seen above which you can check out here.

XOXO, KC & Kevin

Tuesday, November 1, 2011

How-To's Day: Make an Upcycled Can Garland

Wanna make this Upcycled Can Garland? You can make one of your own with a short amount of time & minimal supplies. It is really durable and has an industrial feel.

The  upcycled aluminum makes a wonderful modern touch when it comes to materials.


Here is the supplies and necessary tools to make this project:

Clean, washed and dried cans, Fiskars Paper Crimper, Gloves, Box cutter or X- acto cutter,  1" circle paper punch, 1/16" hole punch, cotton crochet thread or sturdy thread & a needle with an eye large enough/ size of the thread. *Optional: Bone folder, extra sharp small scissors


Here is the basics on stripping down a can to utilize it as supplies:


I like to make the first vertical cut where the nutritional facts or writing is.  I marked in the photo where the initial cuts are made- you can mark it if you'd like, but I just marked it for this tutorial.


Once you cut up the middle you can move on to the top:


After you take the top off, use the same method to remove the bottom. Once you get the top and bottom removed you can flatten it out.  Anything with a 90 degree edge like a table. You can run the can rectangle across it to help flatten it out.


 Yay! Now the can is ready to be used in what ever project you may desire. ;)


 The next step is using your 1" circle punch to make circles out of the can.  


Until this project I had no idea you could use the paper punch on aluminum cans. They work great! If this is something that interests you/ you respond to the materials you should try other punches too.


I like to get as many circles out of a can as possible, which takes some patience- but I want to make the most of my materials. Plus, I think assembly line style saves time in the long run... Whatever you choose, get your circles ready and on to the next step. I made 100 circles in my garland. 

Finished length: ~8' (It's a bit longer + string length) I think it was a bit too long for the string strength. I would say get 100 circles made then see how much the smaller amount of thread described below needs.


Use the small 1/16" hole punch 2-holes across from each other.


The part that I think makes this project look "un-handmade" is this crimper.  The Fiskars Paper Crimper is available online or is a great addition to use one of those JoAnn 40% off coupons. When you run the circle through the crimper they end up coming out oval looking. I made sure the holes are parallel and in line with  the crimper lines.  Doing it other ways makes the shape different. Test out other ways if you'd like too. 


Once they come out of the crimper, I took a second to run the bone folder down the 2 sides to smooth them out.  This part isn't necessary, just an added step you can take.  Here is the finished circle:


Now to MAKE the Garland:


I took the thread and spread it arm to arm 3 times when I tried it the first time.  I think that  length was a bit too long to use... Towards the end, after the thread went in and out- rubbing across the aluminum so many times it made the string fuzzy towards the end. My best advise is to make the garland with 2 arms lengths of string and make it closer to 6' rather than using 3 arms lengths of string which made 8'.


Once you knot the tread onto the first circle you string up the back and out the bottom hole.


Loop it back through the hole before stitching into the side you want facing up. To make it shiny and reversible/ cool from both sides I flipped the side that showed so that every other one was the printed side:

The stitch connecting the next circle doubles back kinda like a figure 8 and holds everything tight and in place. To save time you can just stitch in and out through the holes- the circles will slide down on to each other. This way is easy and will pretty much look the same. With stitching each one together  and doubling back took me  the good part of the afternoon- it is a super afternoon movie watching project :)


Continue stitching them together until you:
A) run out of string B) It get's long enough for you to decide it's long enough C) You run out of patience or D) all of the above ;)


Then you are all finished! Yay!! Now decorate and use it- It is great to enjoy  the fruits of your labor:


We'd love to see your finished garland or other projects that use these "sequins" for your upcycled Holiday celebrations this year.

Good luck and happy making! XOXO, KC

Thursday, October 27, 2011

Patchwork Indie Art & Craft Festival Holiday '11

We are super excited to be vending at this year's Patchwork show in 
Long Beach & Culver City!!! Nov. 6th and Nov. 13th

For more details check out the Facebook page here.

XOXO, KC

Monday, October 24, 2011

Weekend Wrap-Up & Coming Up this Week Oct. 24th-28th

Why Hello there :)  
Hope you are having a super day and y'all enjoyed the weekend- we sure did!  Kevin worked Saturday so I did too.  We squeezed a lot in to what time we had left so this weekend felt really productive.

In my what I wore Friday post I dropped a note about our karaoke night but didn't include this gem:
Yes. They are indeed singing Right Said Fred- I'm too sexy.  That totally happened.  For more details/what else went down- check the post here.

It felt like the end of summer here this weekend.  I was quite surprised how sunny and beautiful it was yesterday in LA. Over all we had a super weekend and I feel like we are making the most of what little time left there is in October.

One of the best things about working for yourself is being able to mix business with pleasure. I really enjoy going to find awesome vintage clothes and other cool things on the weekends. Sometimes there are a ton of items I want to collect and save for my personal collection and it helps to be able to wear multiple hats.  While other times I find tons of things that I look at thinking that someone in need could really use this, its just not for me or the business.  

Going to Jet Rag is definitely one of my addictions, and I recently figured out how to connect a need (homeless people who are cold during the winter) to a solution (provide them blankets and coats) while second-hand shopping :)

It hit me recently that searching for someone that is heading up initiatives that I see a need for- well, they may not exist because I am meant to pioneer them. Make Shop Live is working towards an effort helping the homeless on Skid Row keep warm this winter by collecting suitable jackets and warm blankets on our shopping excursions. 
*We could totally use any suggestions for names for this skid row project if anyone has ideas.
**Also, if you are in the LA area and have any warm clothes or jackets to donate we will gather those for the people too.

For our shopping trip yesterday Kevin and I met up with our friends from Maiden Voyage, Klara & Tyson,  at Jet Rag and we turned them onto the $1 SALE.  We had such a good time digging for treasure and trying on ridiculous outfits. We were able to get several jackets and hand crochet blankets to donate to people this winter yesterday so the adventure was also a success. 

After shopping we had brunch and met Klara and Tyson's new little rescued kitty who is super cute! We got a bag full of peppers and tomatoes from their garden and called it a day.  We were hoping to check out the Tim Burton exhibit at the LACMA, but it is crazy since the exhibit is about to close and I think we'll have a better chance not fighting for the tickets if I pick them up in advance.  I look forward to sharing my thoughts on the exhibit once we go.

For the tutorial/ project tomorrow, I think it is going to be a collection of Halloween projects I find online.  I am not too big on making things for Halloween myself.  I am pretty sure it's because I grew up on a street with no kids for the most part so trick-or-treating was a total drag and no one decorated anything.  Pretty depressing I know right??? I love when people are totally into it and I am a totally appreciator of the hard work that goes into costumes, its just not my thing. I did break my "not buying new things rule" to buy a cat costume from Petco... I think that is about the extent to my decorating/ Halloween enthusiasm.  

Christmas on the other hand, I want to start decorating for now! I have been working on a new twist to the circle garland. This one for the Holidays that is made from aluminum cans. This will be the main tutorial for November and I wanted to give you a sneak peek of how great this shinny, upcycled garland is so you can start collecting your aluminum cans for this project.

So, that is that ;) I am not sure if it is the weather getting colder or if it is because I am busy at the moment but my shoulder is killing! I am gonna run and ice it/ call it a night.
XOXO, KC

Tuesday, December 21, 2010

How- To: Fun Coin Ornaments


This last minute How- To is all about making Fun ornaments from Coins and Pressed Pennies.  We have been geeked out for TRON Legacy for a while.  It was one of the longest production schedules Kevin has worked on, and it was his first time being a Lead, which makes it even sweeter! So when we got the opportunity to go to the elecTRONica set up in Disney California Adventure and check out the retro Flynn's Arcade we reverted back to the old days.  All the machines took tokens that we saved as souvenirs.  I was also on the hunt for the pressing penny machines.  It is kinda my thing. I also have a best friend that collects the pennies as well, so it is a must at tourist destinations.  I am constantly evolving ways for us to collect these pennies and here is a great project for an ornament that highlights the coin.

Wednesday, December 15, 2010

UNIQUE LA Pictures and *DISCOUNT*

It was so great seeing all of our great friends and fans at UNIQUE LA this past weekend!!! 

Leah, Kristin and I got together Friday to decorate the booth.  We had a great time, and I am so glad we were able to get together because here is all of us vendors in line just an hour before the shopping starts!  I am not sure yet of the overall count for the weekend, but last I heard there was ~8,000 People who attended on Saturday.

I was really impressed with the Holiday Displays at West Elm this year.  I loved that the majority of the decorations were all paper.  The packaging was clear on some of it, but I am not sure if they are recycled which would elevate everything to AWESOME. But, the Christmas Tree made from Books was definitely one of my favorite parts.

Our inspiration picture is bellow-

Highlights of our Winter Wonderland set-up: Meyers Dryer Sheet Paper Rosette Snowflakes, Recycled Box Tree Branches, Paper Strips from around the Studio in Paper Chains. In the back a "Gift", a wall decorated as a package and tag. Wrapped in patterned paper with recycling symbols.

Monday, November 22, 2010

Weekend Wrap-Up and Patchwork Long Beach

 We had a WONDERFUL weekend!!! Yesterday the weather held out.  The sun came out.  And besides the harsh and extreme winds, everything went with out a hitch!

The REINBEERS fended well with the wind and proved to be a show stopper as always. We got a TON of Miller Lite requests...  If there are any readers who drink Miller Lite or any friends that want to come over and drink it while we make REINBEERS, please let me know- We can even issue some coupon codes for our Etsy shop in exchange for your cans.

Tuesday, November 16, 2010

Coming Up This Week: Nov. 15th- 21st *PATCHWORK SHOW*

This week is our last week before our first HOLIDAY show.  Where did the time go??? Last week we got some great sales and traffic on our Etsy site.  The free shipping on REINBEERS went amazingly well and depending on how the Patchwork Indie Arts & Craft Festival goes we are scheming a fun Black Friday/ Cyber Monday Sale .

Kevin went back to work yesterday on a new project and I am super excited that we had that nice break together.  We had the best time.  Kevin put together some new furniture together for our Living Room/ Dining Area that is finally free of my "chair"- we'll have to get pictures up soon.  Right now my main priority is to make as much stuff as possible to have ready for these shows.  Kevin has been busy at night getting record stands ready.  Hopefully next week we will get a ton of items up on Etsy before Thanksgiving.

Back to work- XOXO, 
KC

Tuesday, November 9, 2010

Paper Decorations for UNIQUE LA

As you may or may not already know we try to feature a How-To or a Tutorial section on our blog on Tuesdays.  Todays segment is going to feature more behind the scenes as well as making a re-purposed staple for fun Eco-crafting.  

Here is the details on some pretty paper rosettes-


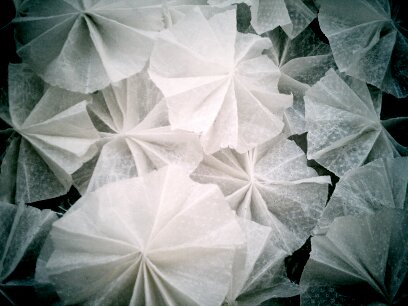
One treat I am really looking forward to for our UNIQUE LA display this Holiday season are these re-purposed paper rosettes we are making as part of our reused paper decorations.

We really love these Mrs. Meyer's Dryer Sheets. They smell super great and are biodegradable versus whatever dryer sheets are made of. Does anyone really know???  They smell super good and hold up as perforated dotted paper after used.  

I have realized my niche is re-using things.  I am pretty sure I would be classified as a "consumer" still. I just make most of my purchases with a unique set of requirements. I feel super smart about making decisions and purchases around how many times I can continue using "the raw product" of each item I purchase. This item especially is one product that excites me to use fully.


These sheets make a great decoration for their second life, and I have been collecting them for months getting ready to utilize them for decorations. At UNIQUE LA's 2010 Holiday Event we are going to deck the decor with these awesome Paper Rosettes made from these used dryer sheets.

Here is the basics.  You save the sheets.  Cut them in half where they are perforated so that one sheet is now two.  Then accordion fold the sheet lengthwise wide enough to accommodate the staple in the middle to bound.

  These bunches are super fun looking all together.  
I can't wait until they are all glued and expanded. They are going to be fantastic!!!
This picture kinda illustrates the finished stapled bunches as of now... I am sure we will collect some more and I will post a finished count for the ridiculous amount above soon. 
***Prize for the person who guesses the right amount of rosettes we have in our booth at UNIQUE LA***

Now we spread each side of the sheet to meet each other and hot glue together. And whala! Beautiful paper rosettes that are super fun and pretty.


Related Posts Plugin for WordPress, Blogger...